How to Hold The Drum Sticks: Matched and Traditional Grip
Matched Grip
Matched Grip is a stick grip where your hands hold the stick in the same way - your hands match. In recent years, this method of holding sticks has become more and more universally taught as the standard grip, especially because it’s the grip used for all other percussion instruments that are played with a stick or mallet.
The first image you see below is probably the more common of the matched grips (Fig. 1). This is the Germanic Style or German grip. It’s characterized by the back of the hand facing upward. This is opposed to the French Grip (Fig. 2), which focuses on finger control by turning the hand so the thumb is on top and the fingers are below the stick. Meanwhile the back of the hand faces outward. French Grip is often taught as a Timpani playing grip for it’s finger control.

Fig. 1 Matched Grip - Germanic or American Style Source: www.ChristianJohnsonDrums.com
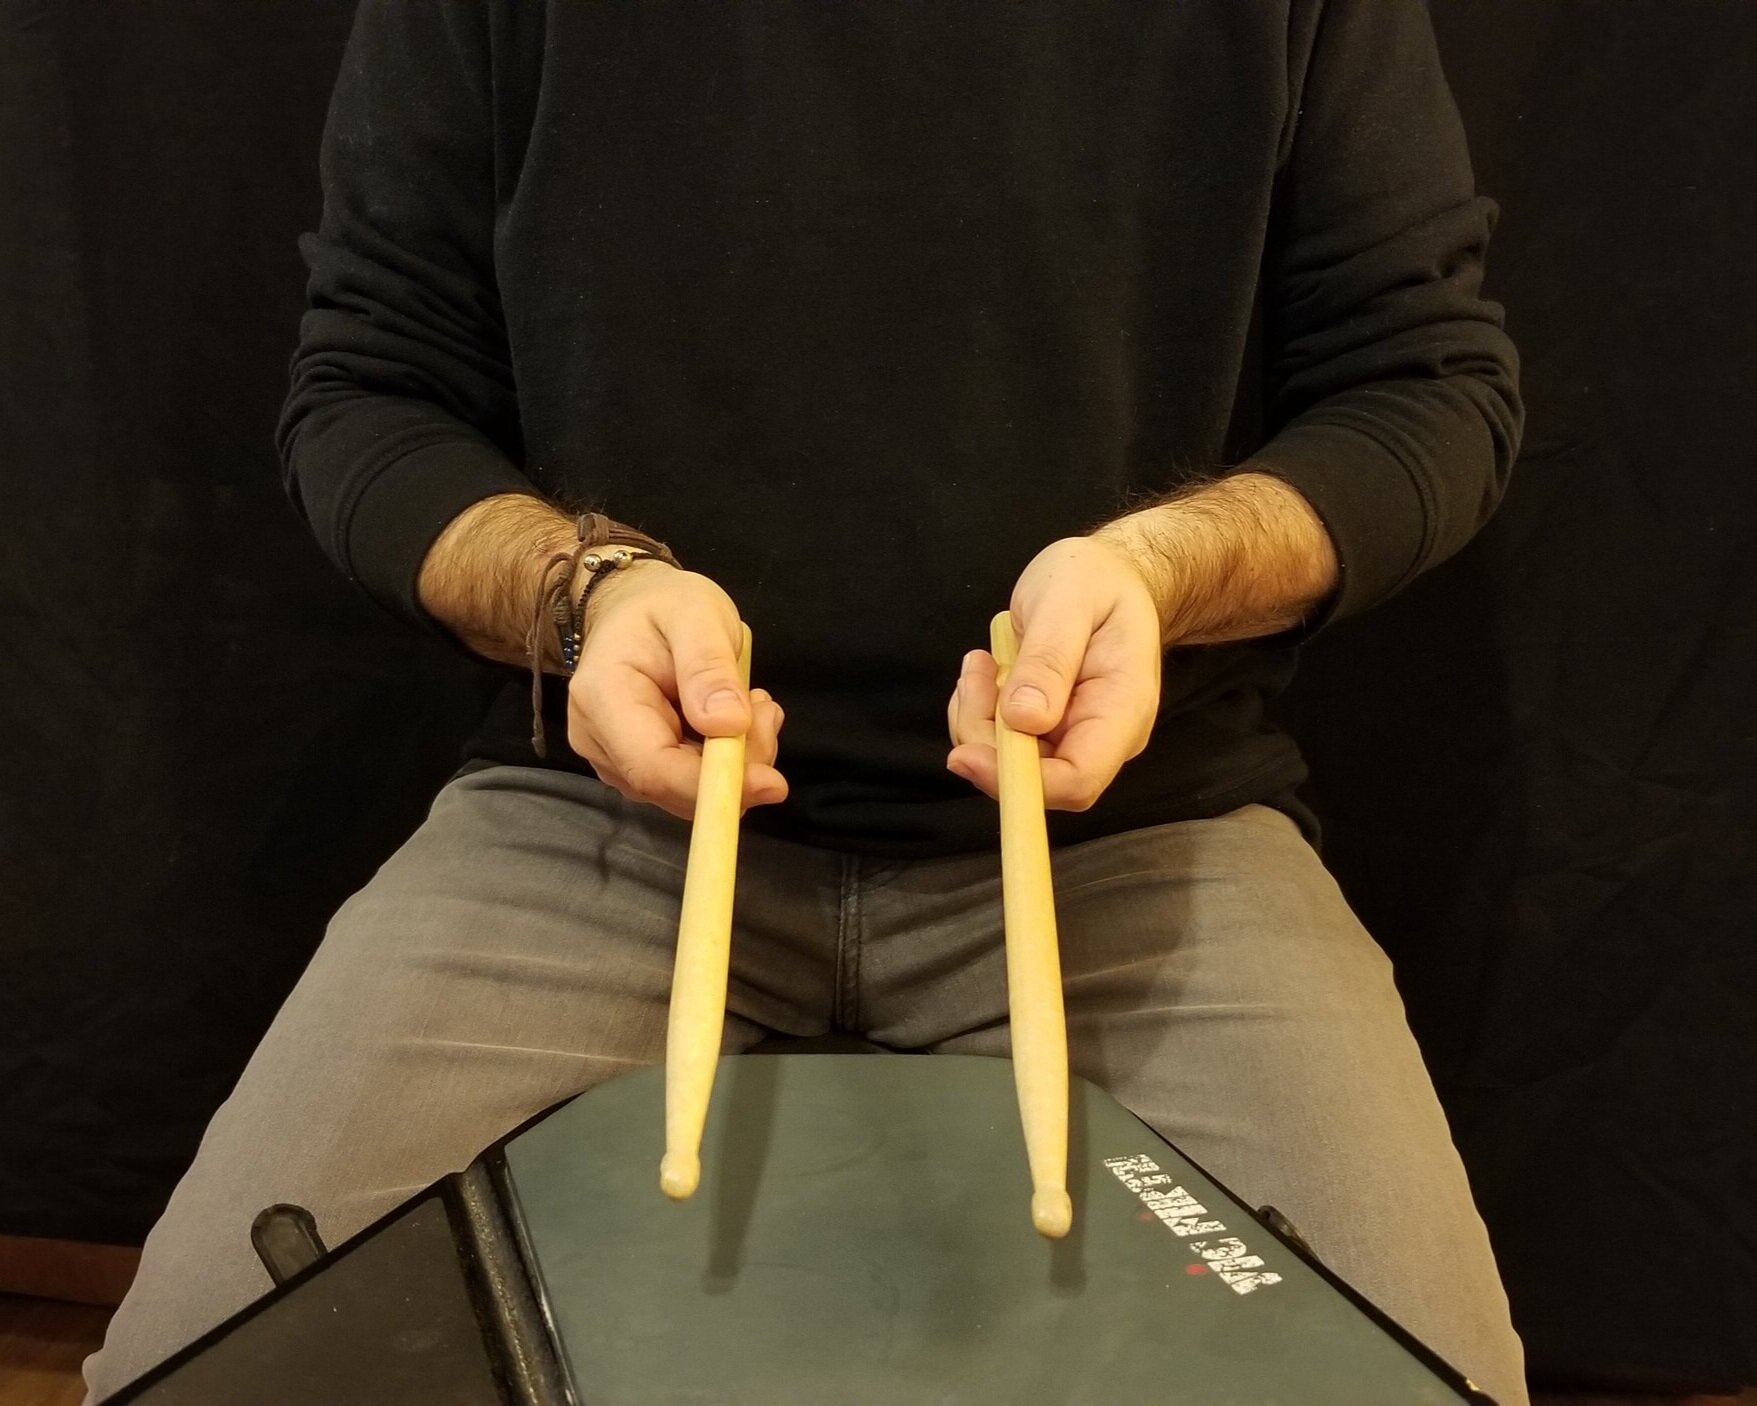
Fig. 2 Matched Grip - French Style Source: www.ChristianJohnsonDrums.com
You might notice that the backs of my hands are facing out at a slight angle as opposed to being straight up. I’ve seen this position called the American Grip. It’s sort of a hybrid between German and French.
In reality, no single grip is “the rule” and having the ability to switch between the various styles of the grip will give you more freedom of expression, and better endurance as you will be able to give your hands some much needed rest while playing.
Building Matched Grip
You start by creating a fulcrum. A fulcrum is a pivot point in a lever. Think of a see-saw at the playground (Fig. 3). Two people sit at either end of the board and alternate taking turns pushing off the ground. Jumping up on one side causes the other side to go down.

Fig. 3 Illustration of a see-saw pointing out the Fulcrum or pivot point. Source: www.ChristianJohnsonDrums.com
In the center of the see-saw is a pivot. It’s usually a metal pole or something like that and it’s the whole reason why a see-saw works.
You’ll create your fulcrum about 4 inches from the butt of the stick. Pinch the stick between the thumb and the first finger (Fig. 4). Watch the video above to see exactly where you should hold the stick.
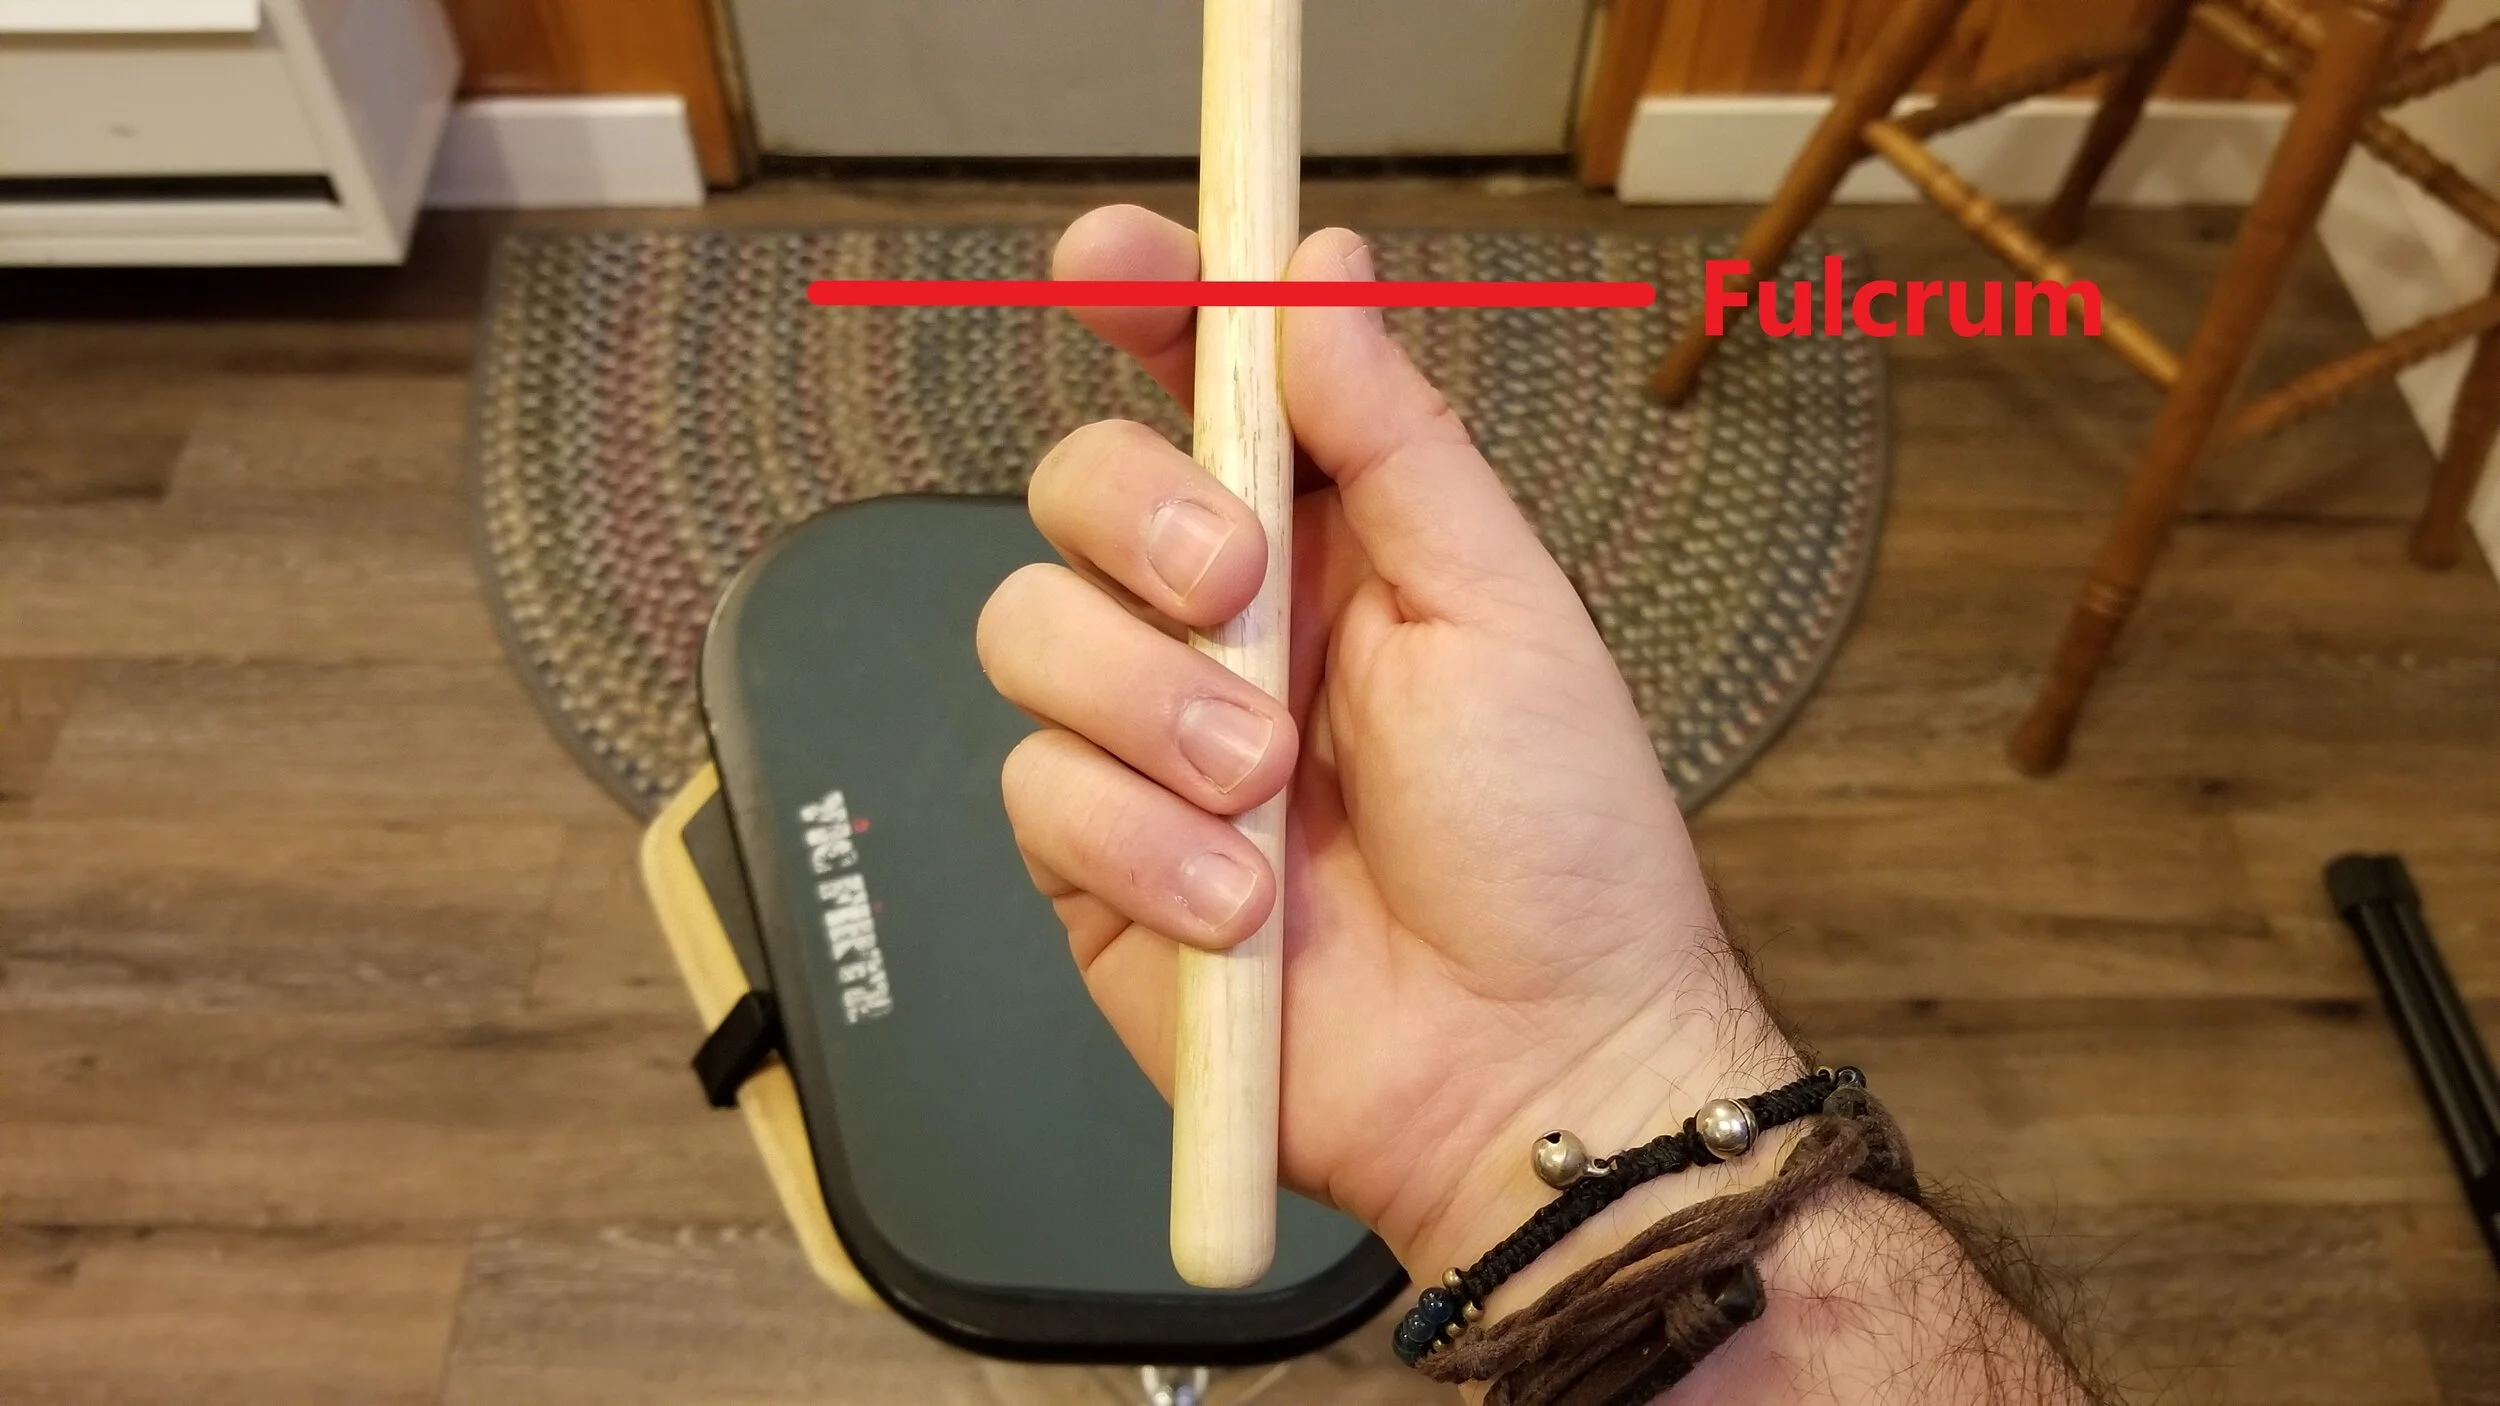
Fig. 4 Create a Fulcrum Source: www.ChristianJohnsonDrums.com
Your thumb should be flat against the side of the stick and holding it against the first knuckle of the index finger. You can imagine a pin going through your thumbnail and into the first finger.
Be sure that you are not squeezing the stick too hard. You just need enough pressure to create some friction between the stick and the fingers, but it should be loose enough that you can move the stick around with your other hand.
The butt of the stick should touch the thick pad of your palm, which acts like a shock absorber. You fingers loosely fall around the rest of the stick and provide control when rebounding and playing rolls (Fig. 5). They do not squeeze the stick!

Fig. 5 The stick touches the thick pad of your palm. Source: www.ChristianJohnsonDrums.com
If you create a fulcrum correctly, the stick will move in your hand like the see-saw (Figs. 6 - 9). As Tommy Igoe says, space in the back creates sound up front. Let that stick move!

Fig. 6 Loosening the fingers allows the stick to come up. Source: www.ChristianJohnsonDrums.com
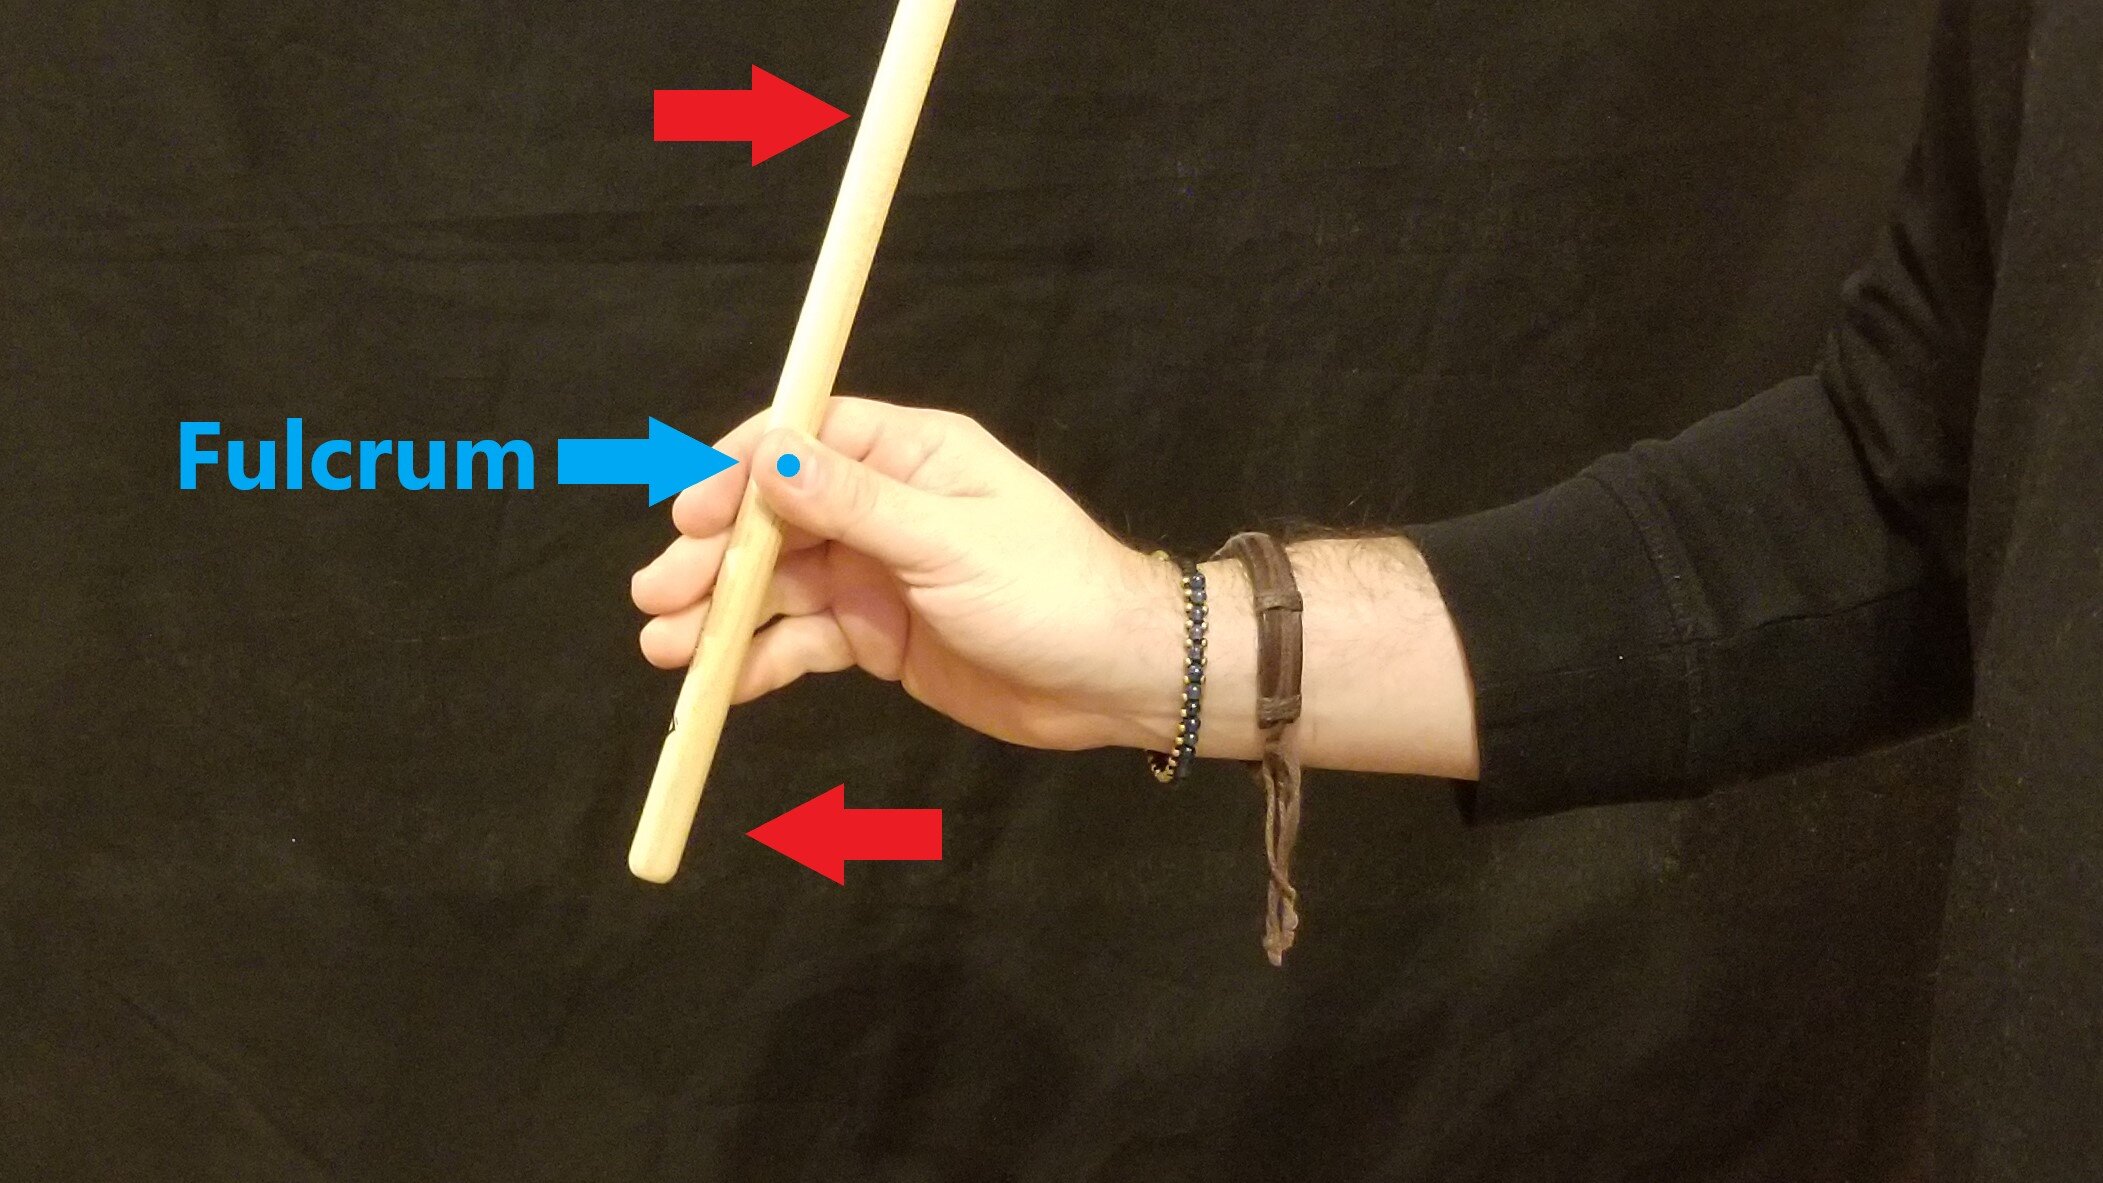
Fig. 7 At full height, the butt of the stick is no longer touching the palm. Source: www.ChristianJohnsonDrums.com

Fig. 8 Closing the fingers will help you throw the stick down. Source: www.ChristianJohnsonDrums.com
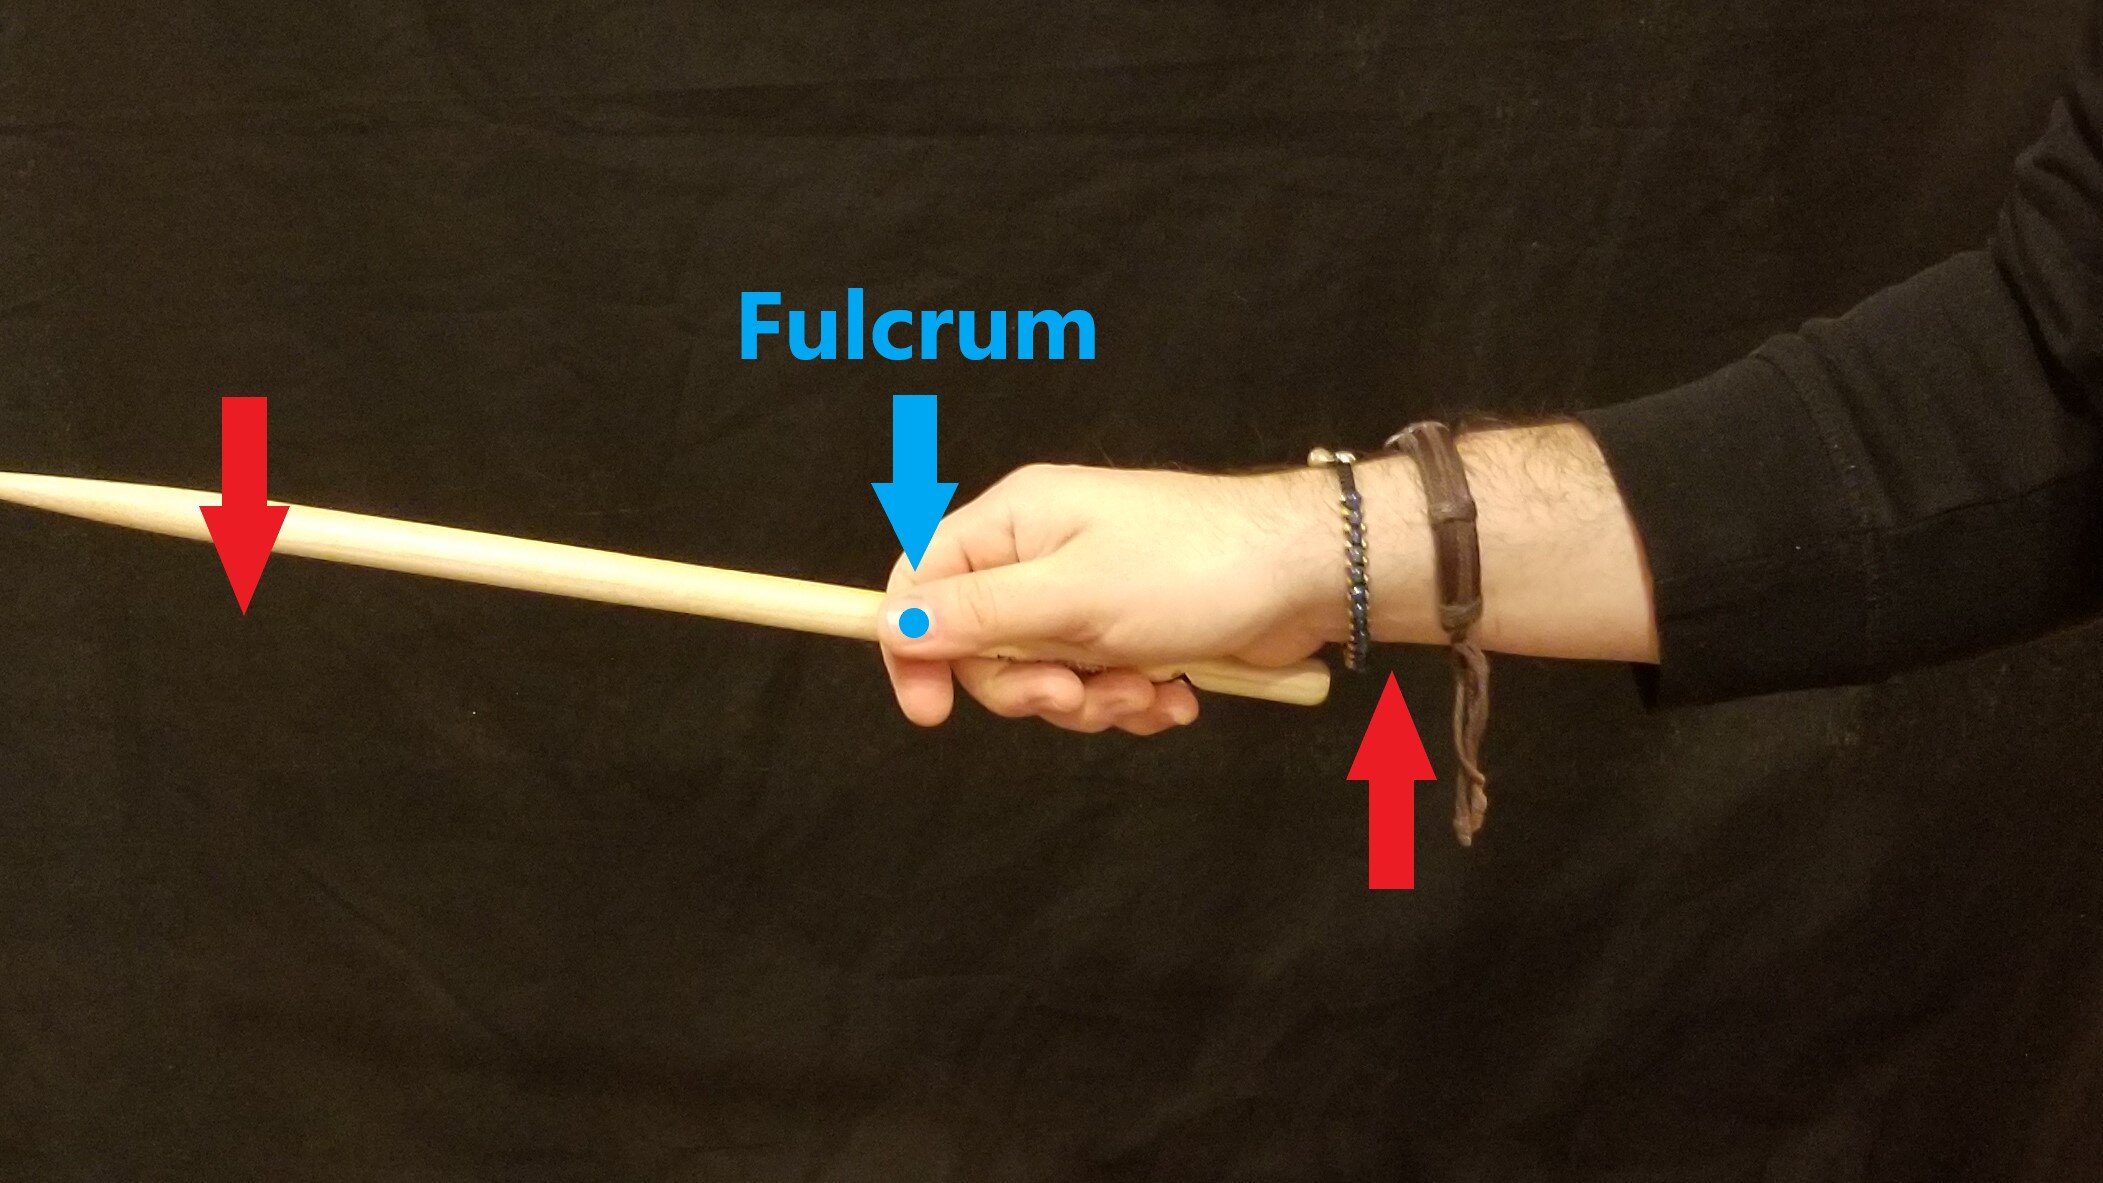
Fig. 9 The force of the downward motion will create more or less volume, depending on how fast the stick moves. Source: www.ChristianJohnsonDrums.com
If you’re playing matched grip, you’re all set! Both of your hands will hold the stick in the same way (Fig. 10).

Fig. 10 Bird’s Eye View: Matched Grip at the drum set. Source: www.ChristianJohnsonDrums.com
If you’re playing traditional grip, read on.
Traditional Grip
Traditional grip isn’t used as much by new drummers anymore because it was developed for a specific purpose. The grip is a hold-over from older times, prior to the development of the modern drum set.
The drums that were used for marching and the military were held up with a shoulder sling or rope thrown over the shoulder. The result was that the drum wasn’t flat it front of the player, it was at an angle, over the left knee.

The Spirit of ‘76 Archibald Willard
The underhand traditional grip was developed to allow the drummers to play on these tilted drums.
Nowadays, drums are flat or tilted toward the player for the most part. Plus, so many other percussion instruments, like timpani and mallet instruments, are played with matched grip. It’s become a bit counterintuitive to use a different grip just for snare drum or drum set.
That doesn’t mean that the grip has limitations. So many excellent players still use traditional grip to this day. Just check out Todd Sucherman, or better yet, this awesome trio of drummers: Dave Weckl, Vinnie Colaiuta and Steve Gadd, all playing Traditional Grip.
Fig. 11 - Drum Solo Featuring Dave Weckl, Vinnie Colaiuta and Steve Gadd
There are also visual reasons you may need to learn traditional grip. For example, drummers in my high school marching band all played traditional grip for a classic look.
Building The Traditional Grip
To create the grip, you start with a fulcrum, just like matched grip. Extend your hand with the palm facing inward. It’s a bit like shaking someone’s hand (Fig. 12).

Fig. 12 Extend your hand like you’re meeting someone for the first time. Source: www.ChristianJohnsonDrums.com
Be sure to find the same balance point at about 4 inches from the butt of the stick and place it in the valley between your thumb and index finger (Fig. 13). Hold the stick in place with a slight pressure from the thumb, but DO NOT SQUEEZE.
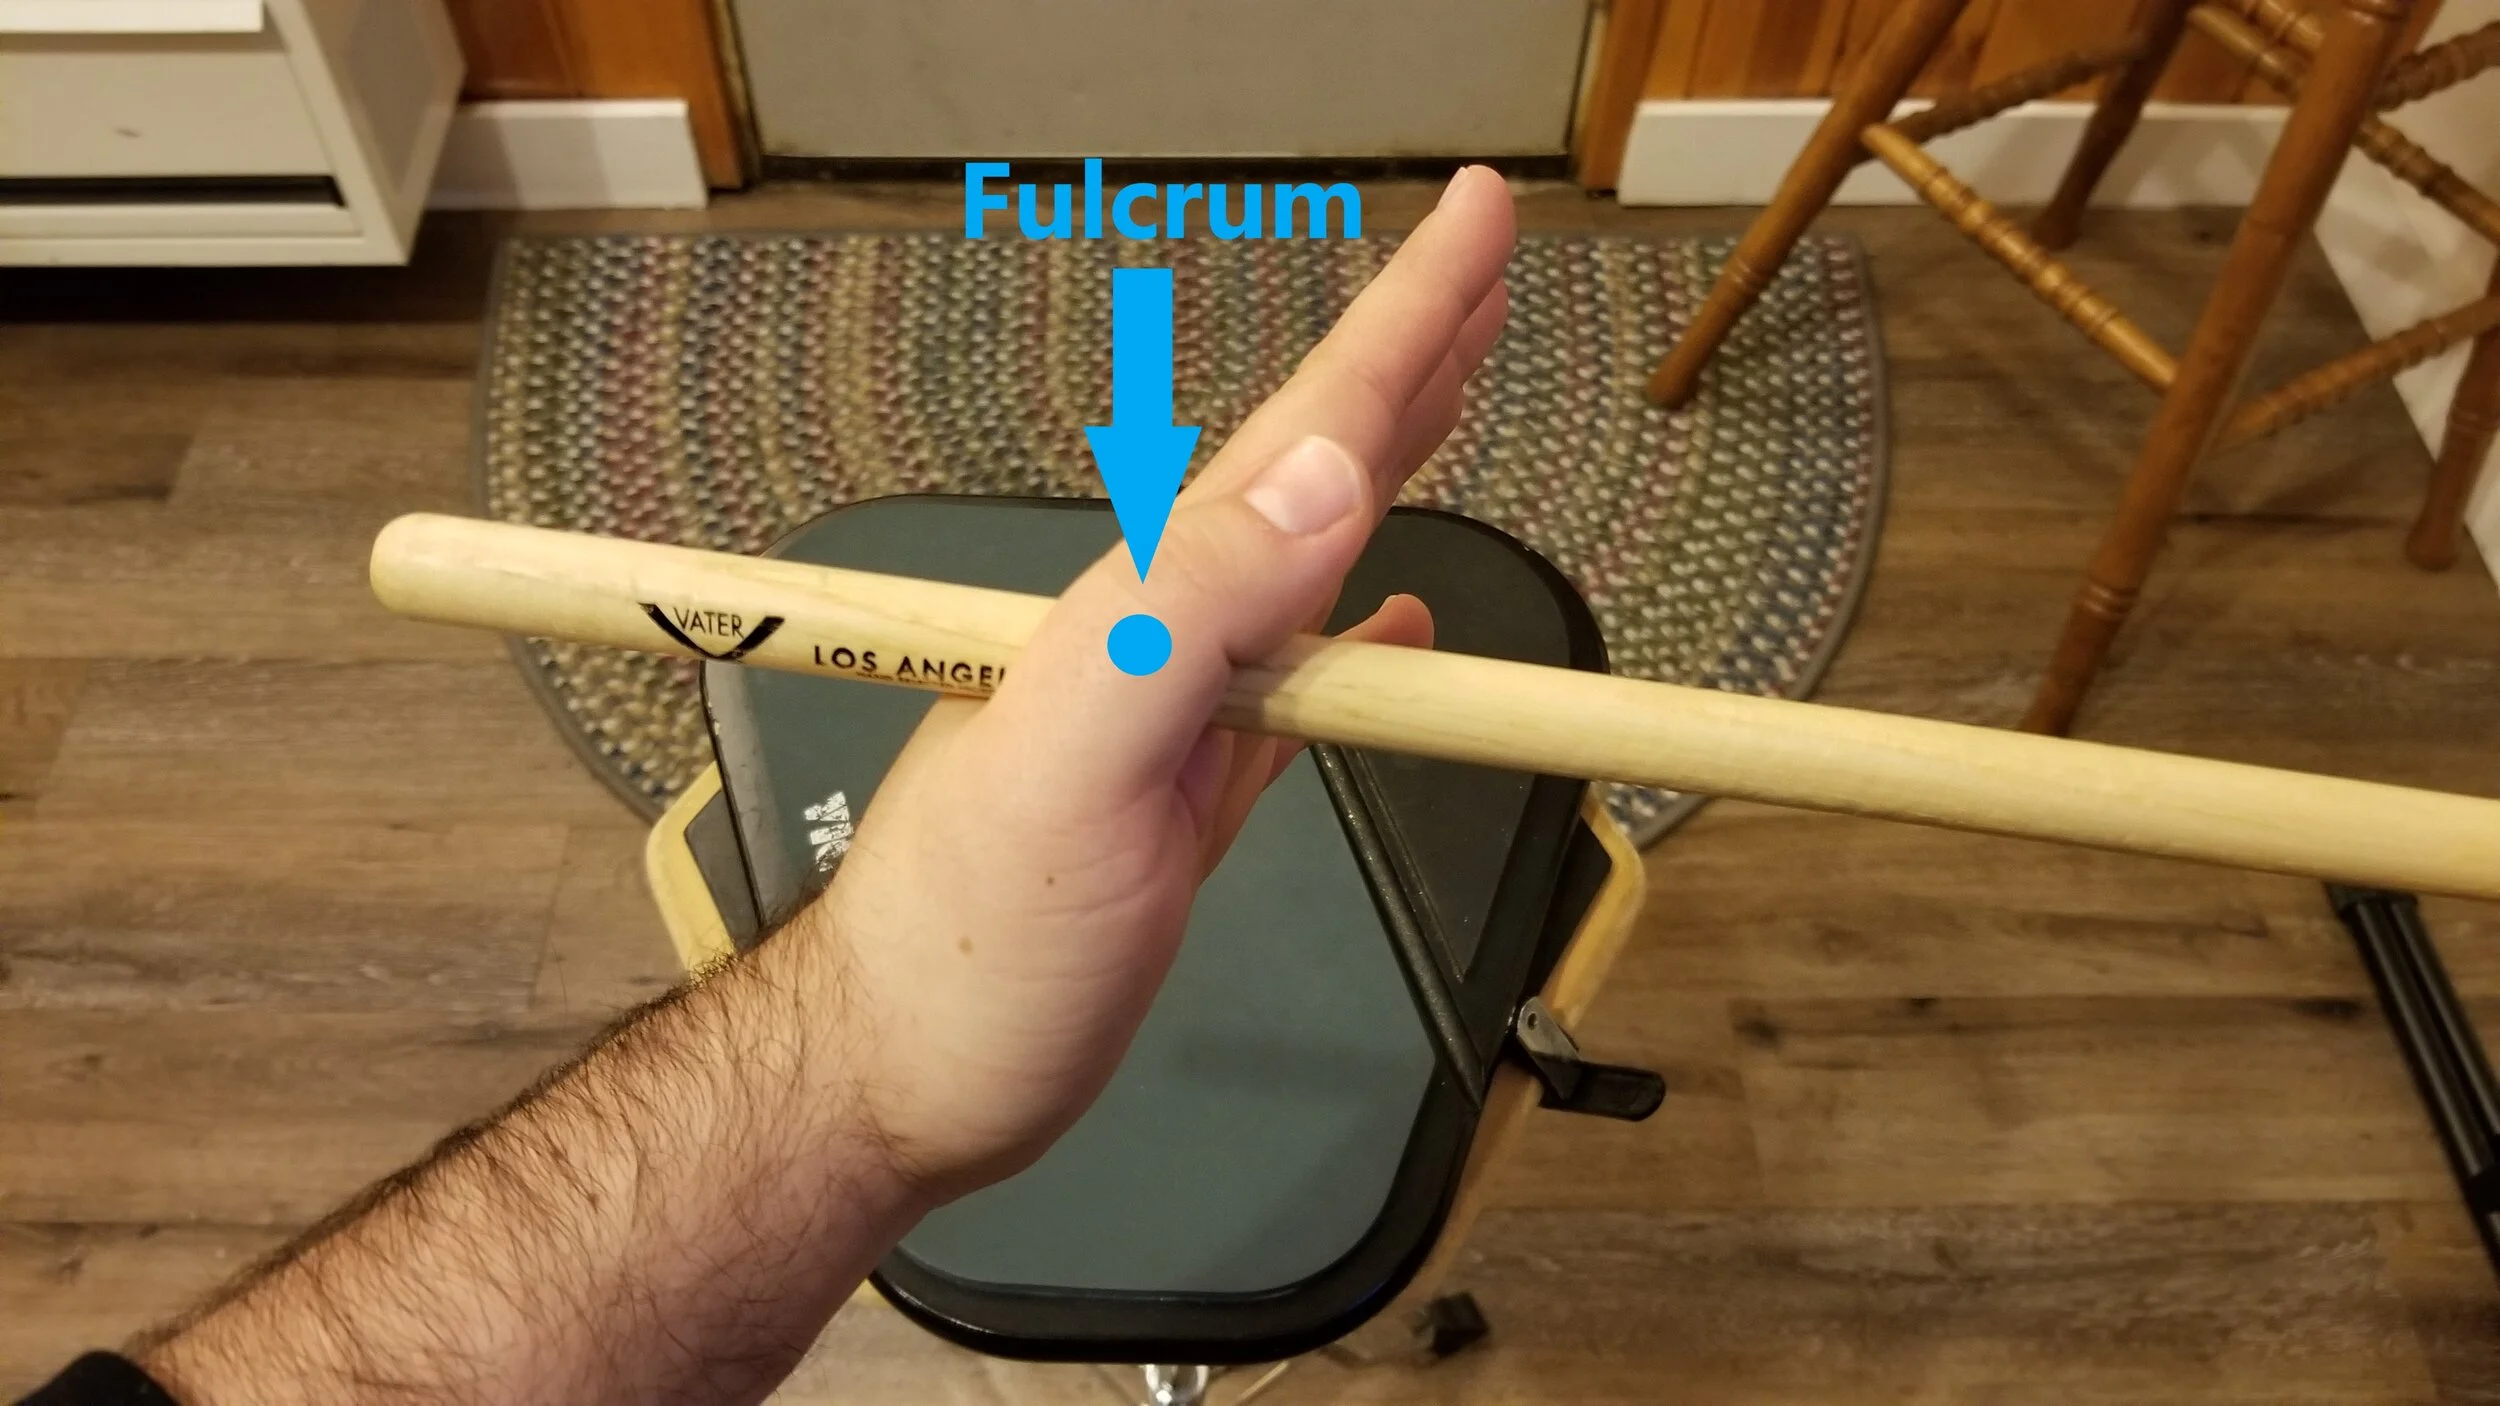
Fig. 13 The fulcrum is made by holding the stick in the valley between the thumb and first finger. Source: www.ChristianJohnsonDrums.com
The ring and pinky fingers curl underneath the stick and provide a platform for the stick to rest (Fig. 14). They play a small part in controlling the stick.
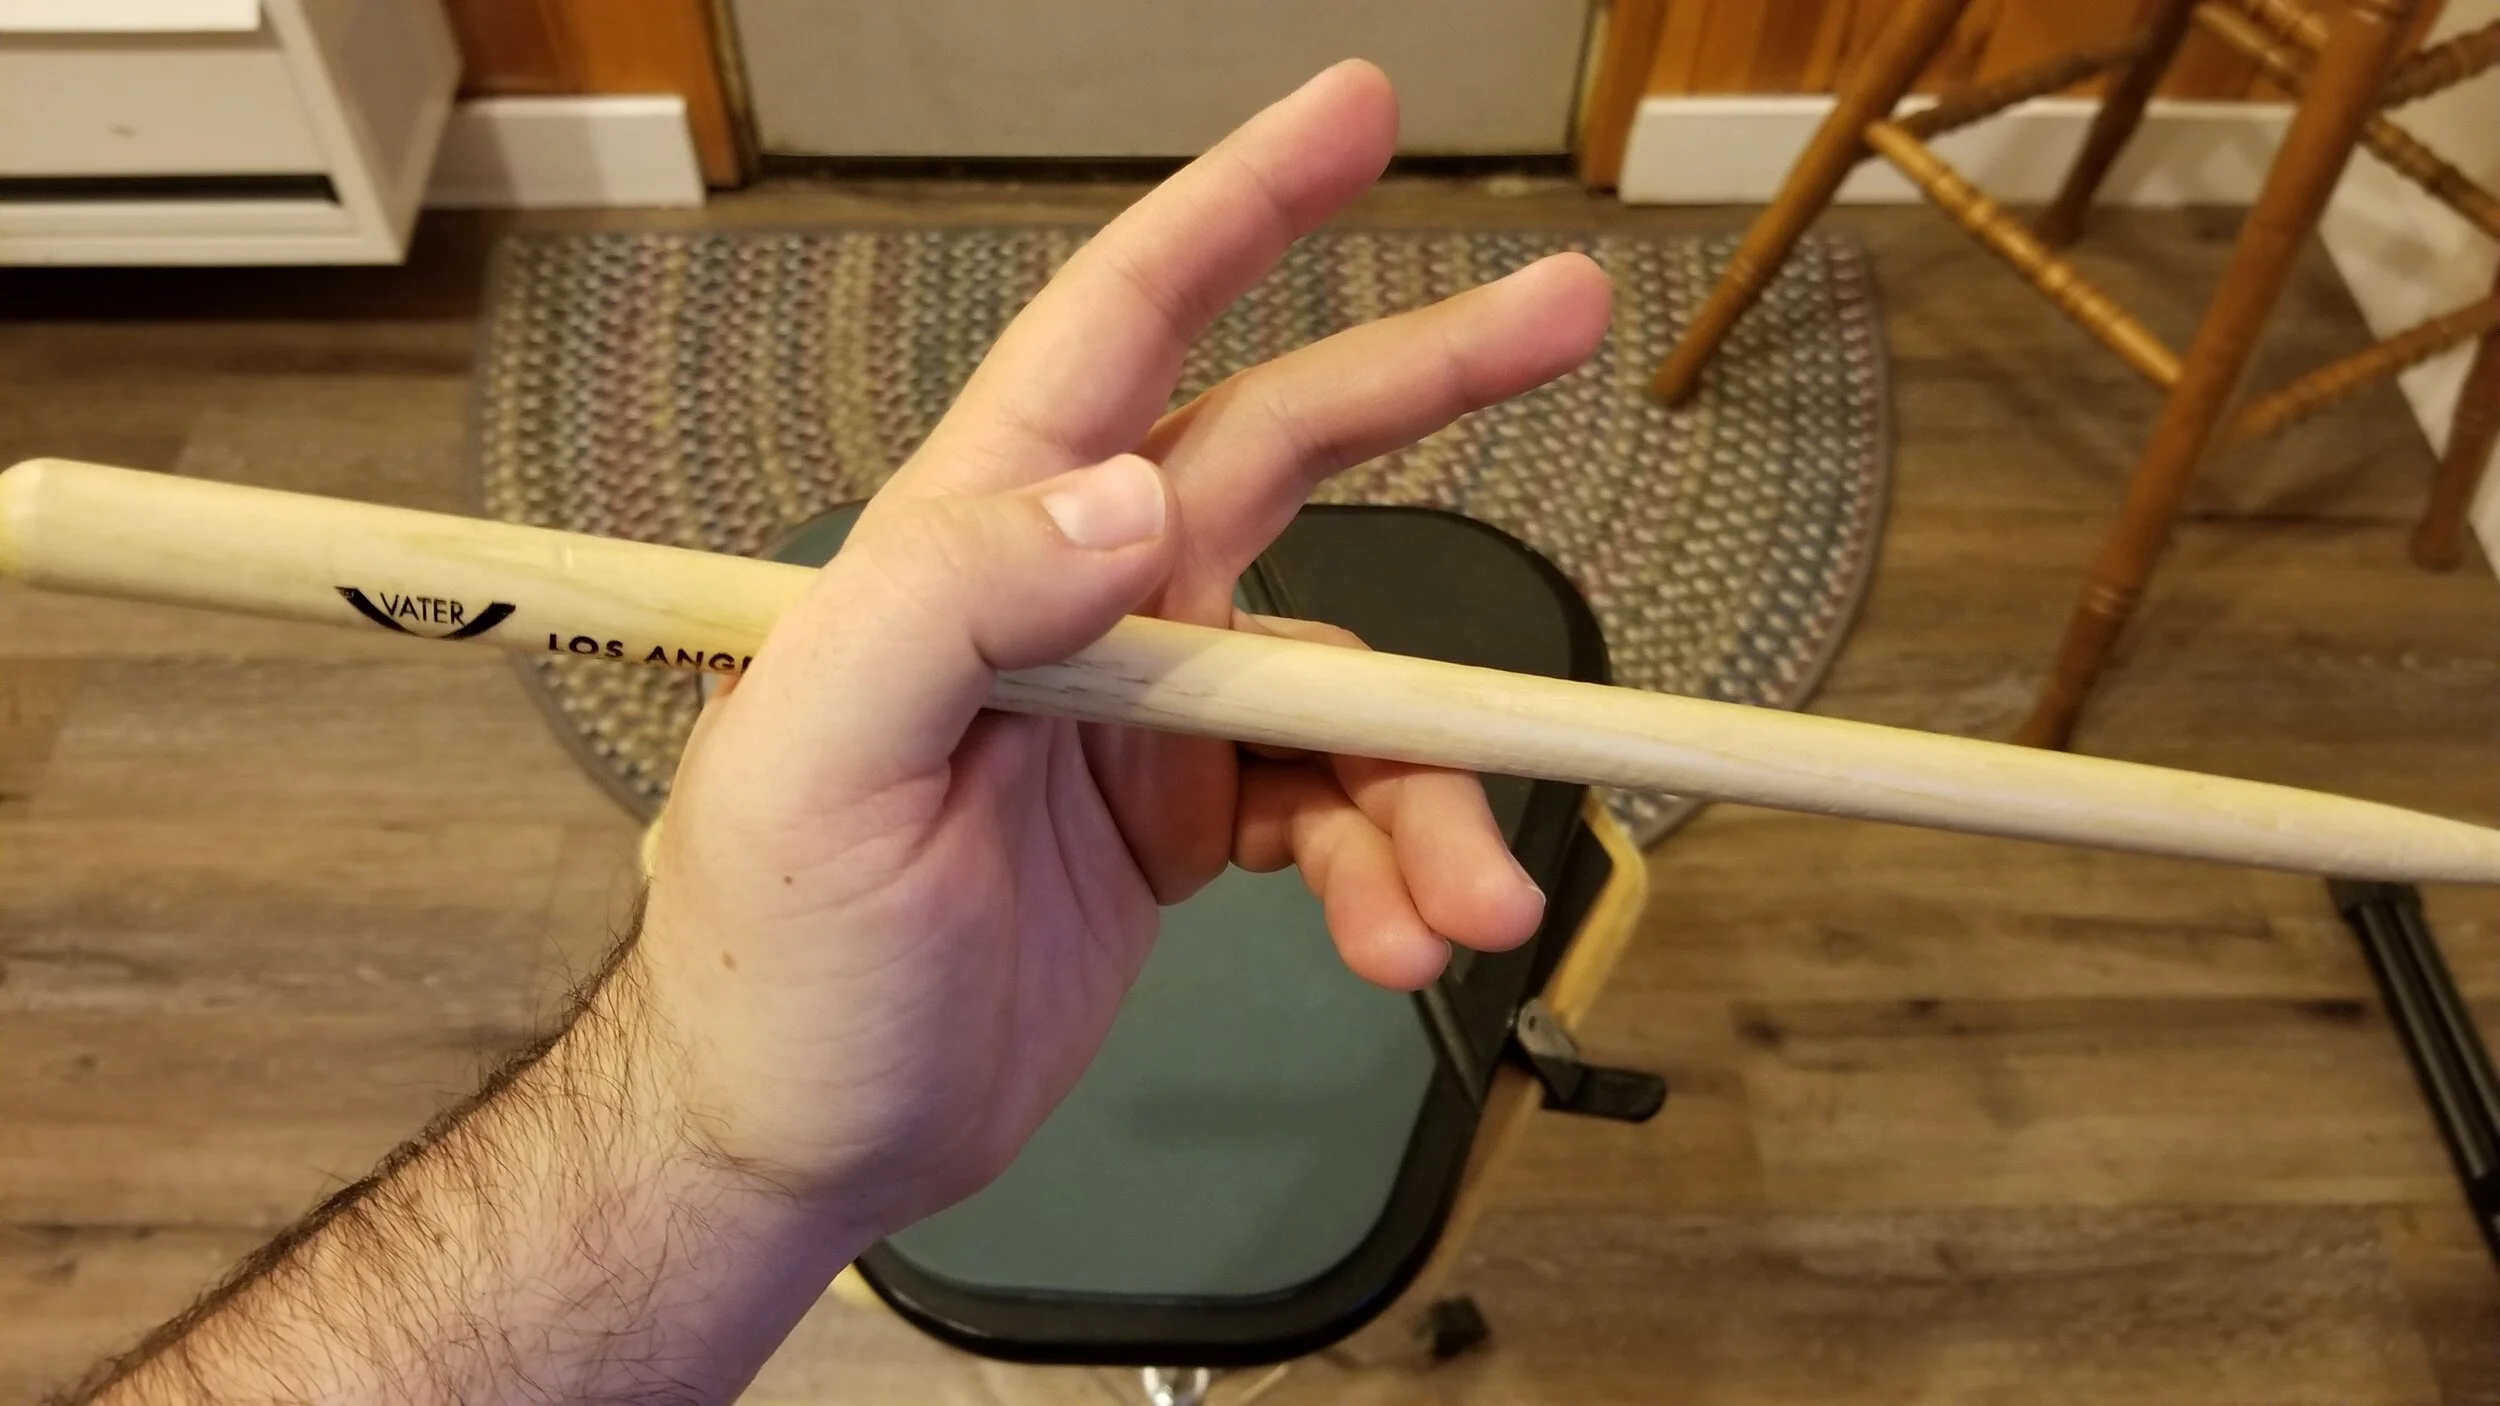
Fig. 14 Curl the ring and pinky fingers under the stick. Source: www.ChristianJohnsonDrums.com
The middle and index fingers lay on top of the stick, but do not squeeze (Fig. 15)! They provide a lot of the control for rebounds and rolls in traditional grip.
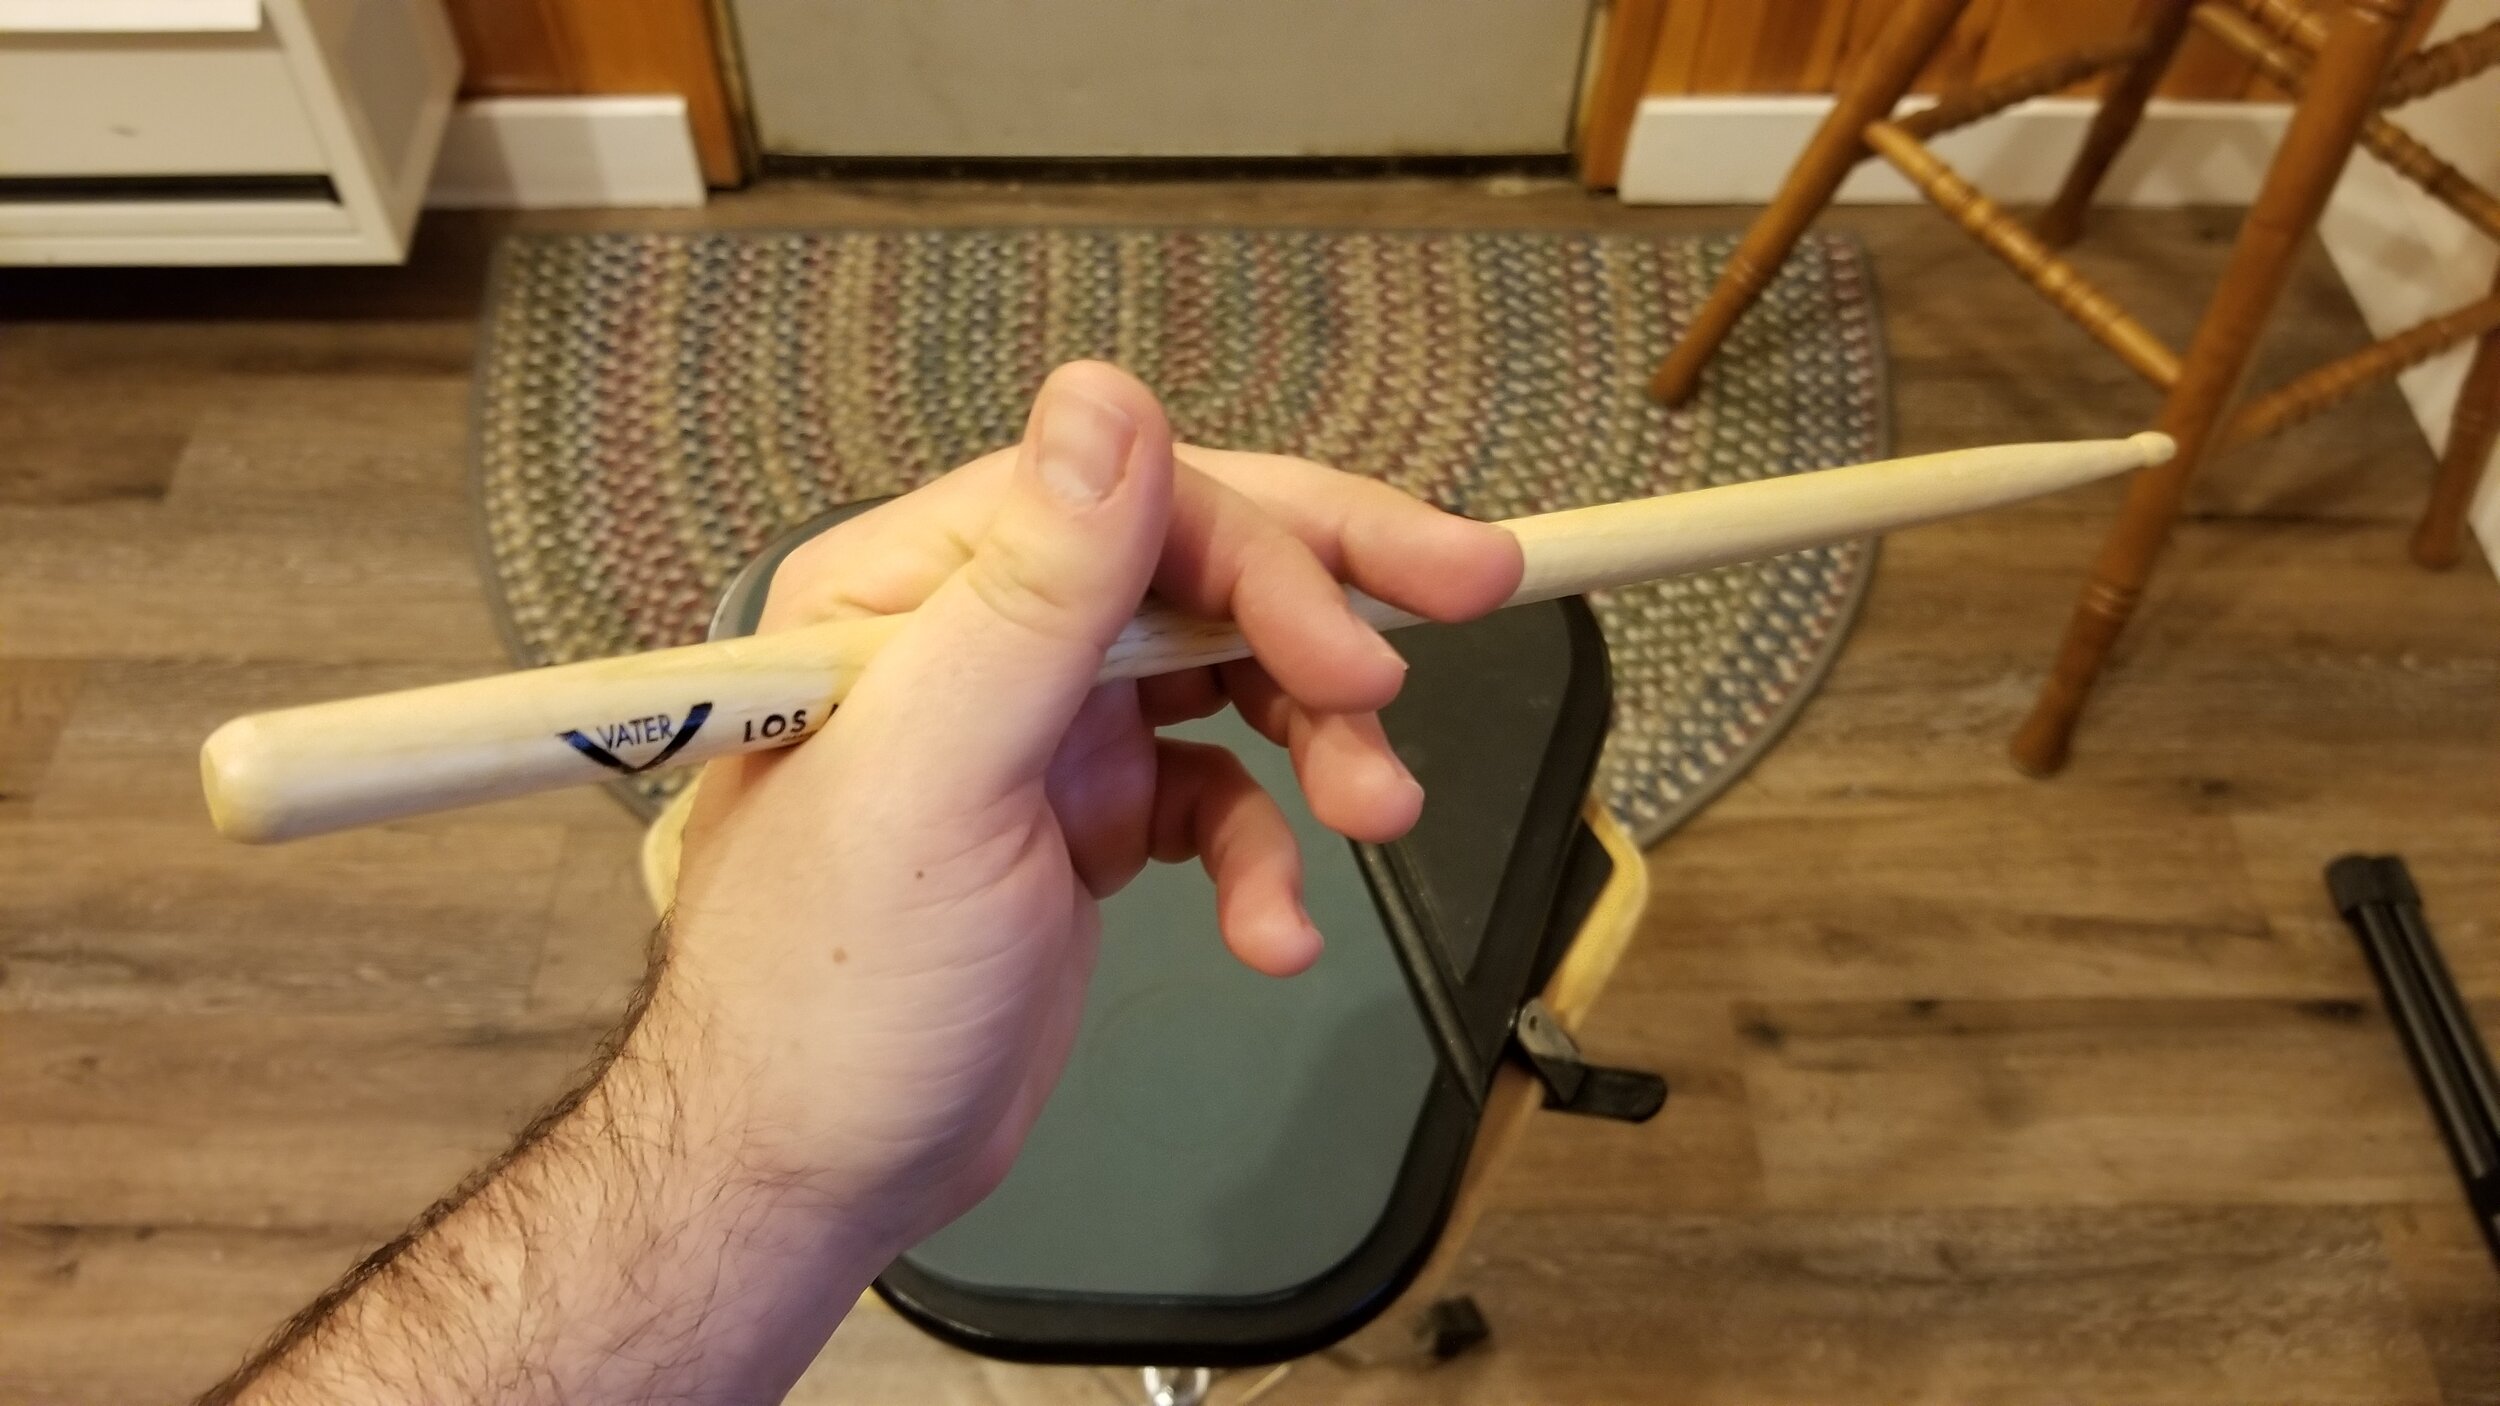
Fig. 15 Like in matched grip, the fingers provide extra control during and after a stick’s rebound. Source: www.ChristianJohnsonDrums.com
The thumb closes the gap and rests on the first finger, somewhere around the middle knuckle.
The motion for playing comes from a wrist twist. It’s a little like shaking water from your hand. The fingers control the rebound of the stick and allow you to play intricate patterns.
If you create the traditional grip correctly, the stick will move just like the see-saw (Figs. 16 - 19).

Fig. 16 Rotating the wrist will start the movement of the stick tip upward. Source: www.ChristianJohnsonDrums.com

Fig. 17 At full height, the butt of the stick is pointing downward. Source: www.ChristianJohnsonDrums.com

Fig. 18 Rotating the wrist downward starts the movement of the stick tip toward the drum. Source: www.ChristianJohnsonDrums.com

Fig. 19 The volume of the hit is determined by the speed of the stroke. The fingers provide fine tuned control of the stick rebound. Source: www.ChristianJohnsonDrums.com
It’s important to note that the images make it look like the fulcrum is the wrist, but it’s not! In Fig. 20, you can see how the stick needs to move in the hand to create the see-saw, and requires little wrist movement.

Fig. 20 Animated Gif Demonstrating the stick movement at the fulcrum with little wrist movement. Source: www.ChristianJohnsonDrums.com
In traditional grip, the other hand will use the same grip as Matched (Fig. 21).
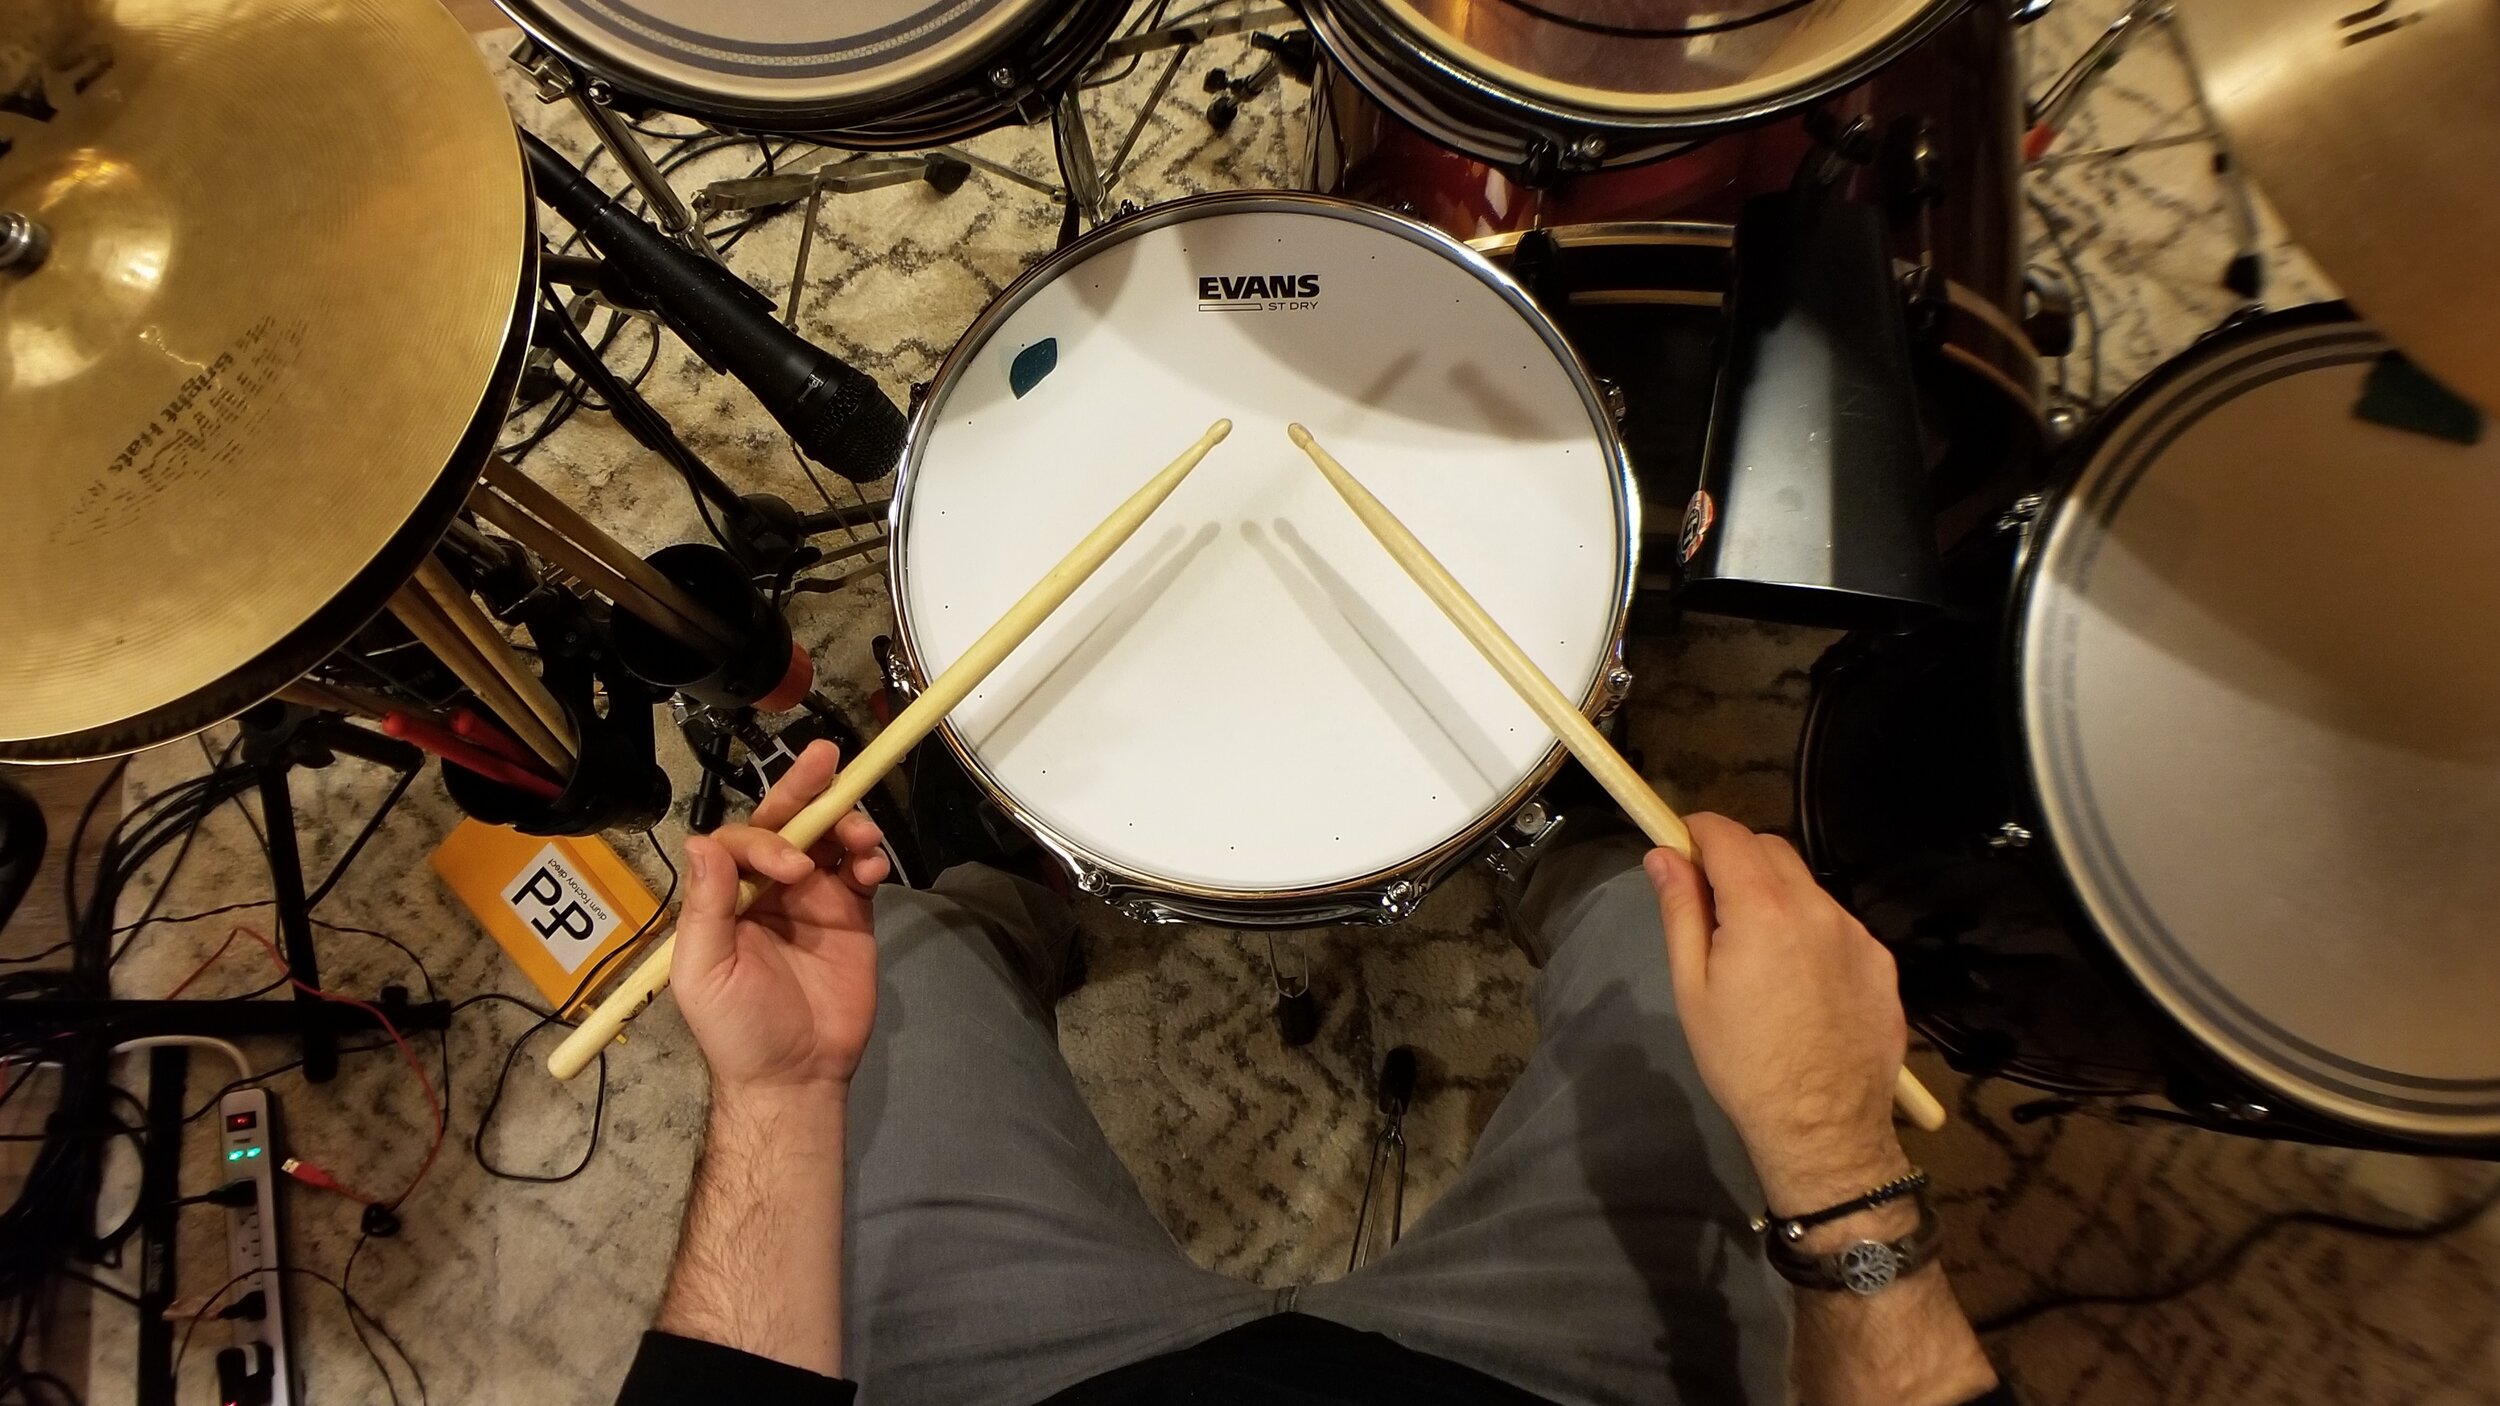
Fig. 21 Bird’s Eye View: Traditional Grip at the drum set. Source: www.ChristianJohnsonDrums.com
It doesn’t matter which grip style you choose, but if you are planning to learn other percussion besides drums, being proficient at the Matched Grips will probably take you further. There are also those that say Traditional Grip is essential for drum set styles like Jazz. Do whatever works for you. To each their own.
The main thing, and you might have noticed that I said this A LOT, is that you do not squeeze the sticks. The stick needs to move and breathe. If you are dropping the sticks a lot at first, that’s a good thing!
Squeezing creates tension, and tension creates stiffness. If you are tense when you play, you’ll have the tendency to force the motion since you’re stiff and the result will be injury - sometimes long-lasting or career-ending injury.
Learn good habits from the very beginning!
Thanks for joining me for this lesson on how to hold the drum sticks. Be on the lookout for more quick reference articles like these in the future.
You can get notified when I post new lessons by subscribing to my newsletter here or by subscribing to my YouTube channel.
See you next time!